Picking the charger is usually the easy part of going electric at home. The real planning happens *before* the installer arrives: where the car actually parks, how far that spot is from your electrical panel, whether the panel has the capacity for a dedicated 240V circuit, and how your charging habits line up with PSO's residential EV rate.
A little planning up front saves Tulsa homeowners from the most common (and most expensive) EV mistakes — buying a charger the panel can't safely support, mounting it where the cord won't reach the car, or installing a temporary setup that has to be redone within a year.
This guide walks through the seven questions to answer before you buy the charger, what's worth knowing about PSO's EV pricing, the cost ranges M Electric publishes for Tulsa installs, and what to expect on installation day.
5 questions to answer
before you buy.
- 1
Where do you park every night?
Garage, driveway, carport, or detached structure?
- 2
How fast do you need to charge?
Level 1 backup (~5 mi/hr) vs. Level 2 daily (~25 mi/hr).
- 3
Can your panel handle it?
Dedicated circuit, breaker space, load calculation.
- 4
Plug-in or hardwired?
Flexibility vs. permanent, weather-rated install.
- 5
When will you charge?
PSO super off-peak window: 11 p.m. to 6 a.m.
Step 1 — Decide Whether Level 1 or Level 2 Charging Fits Your Life
Level 1 Charging Uses a Standard 120V Outlet
Level 1 is the slow-and-simple option. Per the U.S. Department of Energy, Level 1 equipment charges through a standard 120V residential outlet and adds roughly 5 miles of range per hour of charging. Over an 8-hour overnight stretch, that's about 40 miles of range — fine for some drivers, frustrating for many.
Level 1 makes sense for:
- Plug-in hybrid owners
- Low-mileage drivers (a short commute, mostly local trips)
- Backup charging or temporary setups
- Renters or homeowners not ready to invest in a dedicated charger
Level 2 Charging Is the Usual Home Upgrade
Level 2 uses a 240V circuit (the same voltage your dryer and AC condenser use) and, per DOE, typically adds about 25 miles of range per hour — often 20–35 miles per hour depending on the vehicle and circuit amperage. That's the difference between "fully charged by morning" and "I should have plugged in two days ago."
Level 2 makes sense for:
- Daily commuters
- Multi-EV households
- Larger-battery EVs
- Drivers who want reliable overnight charging
- Anyone who'd rather not depend on public charging
Why This Matters Before You Buy the Charger
Different chargers want different circuits. A 32-amp Level 2 charger lives on a 40-amp dedicated breaker; a 48-amp charger wants a 60-amp dedicated breaker and significantly heavier wire. Buying a high-amperage charger before checking your panel and routing path is the #1 reason home EV projects stall out.
Not sure whether Level 1 or Level 2 makes more sense? M Electric can evaluate your driving needs alongside your electrical setup. → EV Charger Installation.
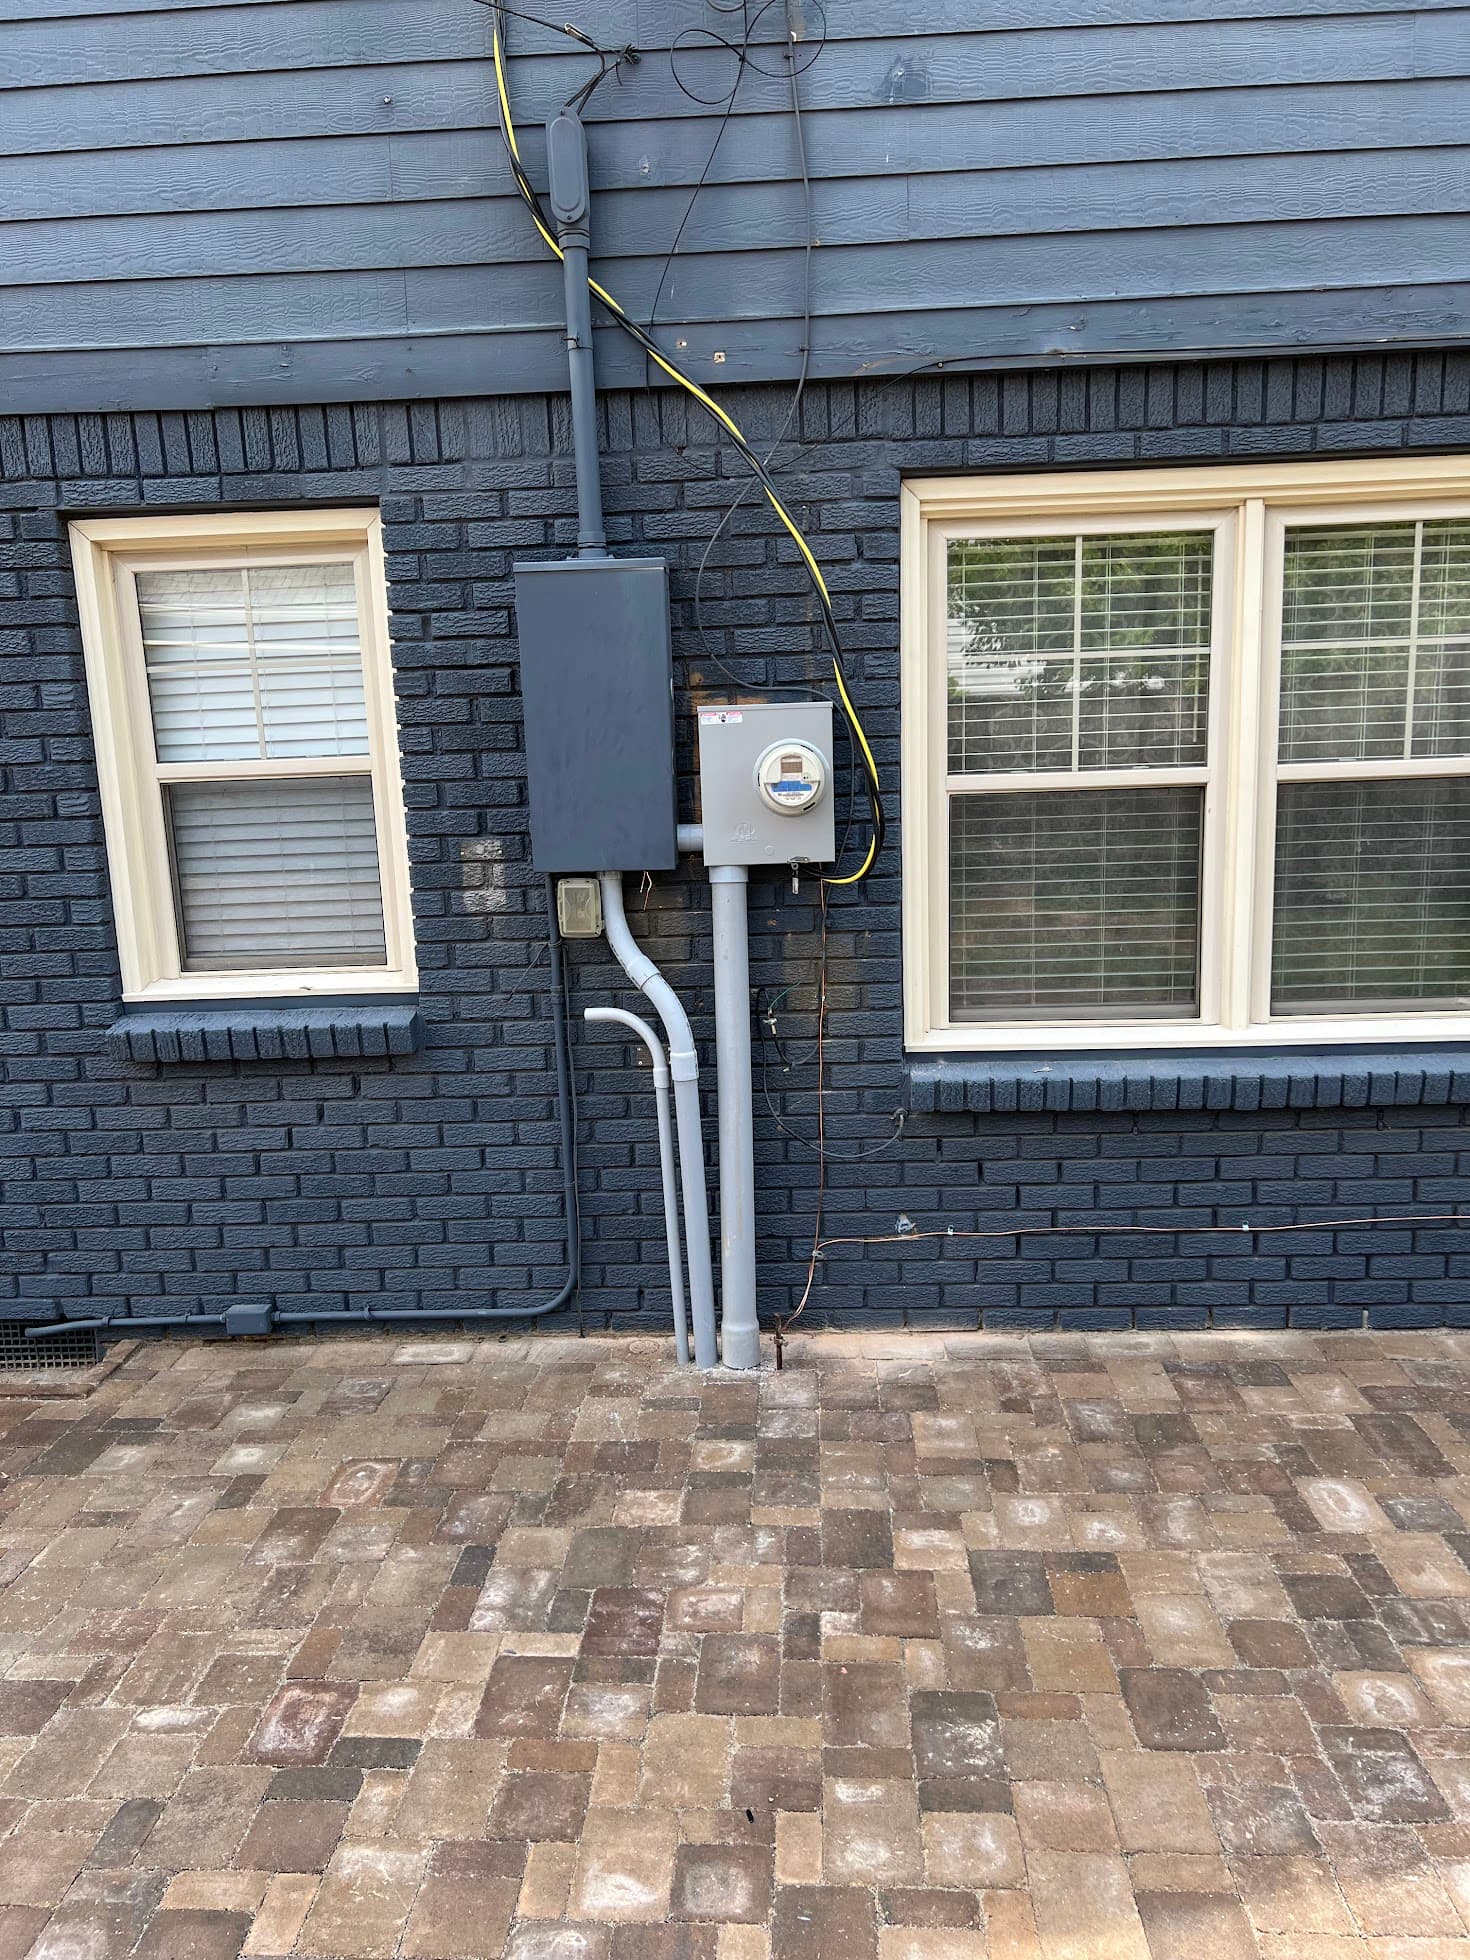
Step 2 — Check Your Electrical Panel Before Choosing a Charger
Level 2 Chargers Need Dedicated Capacity
Most residential Level 2 chargers run up to 32 or 40 amps continuous and need their own dedicated 240V circuit — typically a 40-amp or 50-amp breaker, with appropriately sized wire and an outdoor disconnect if required by code. NEC Article 625 (the section of the National Electrical Code dedicated to EV charging) governs how those circuits are sized and installed.
You don't need to memorize any of that. You do need an electrician to confirm that:
- Your panel has open breaker space (or can be reworked to make some)
- Your service can carry the new load on top of everything else the house is doing
- The conductor route from the panel to the charger is workable
Signs Your Panel May Need Attention First
Pause before buying any charger if your home shows any of these:
- The panel is full (no open slots)
- Breakers trip often, especially during summer
- Lights dim when the AC or other large appliances start
- The panel feels warm to the touch
- Burning smell or buzzing near the panel
- Older 100-amp service
- Existing big loads (hot tub, second HVAC zone, workshop, generator, or another EV charger)
Any of those is a good reason for a panel upgrade evaluation before charger shopping.
Load Calculation Beats Guessing
A real load calculation considers the home's actual usage pattern — HVAC, water heating, range, dryer, existing dedicated circuits, planned upgrades, and the proposed charger. Some Tulsa homes can absorb a 40-amp Level 2 install as-is. Others need a smaller charger, load-management hardware, new circuits, or a service upgrade. The only way to know is to look.
Before buying a 40A or 48A charger, schedule a panel capacity check with M Electric.
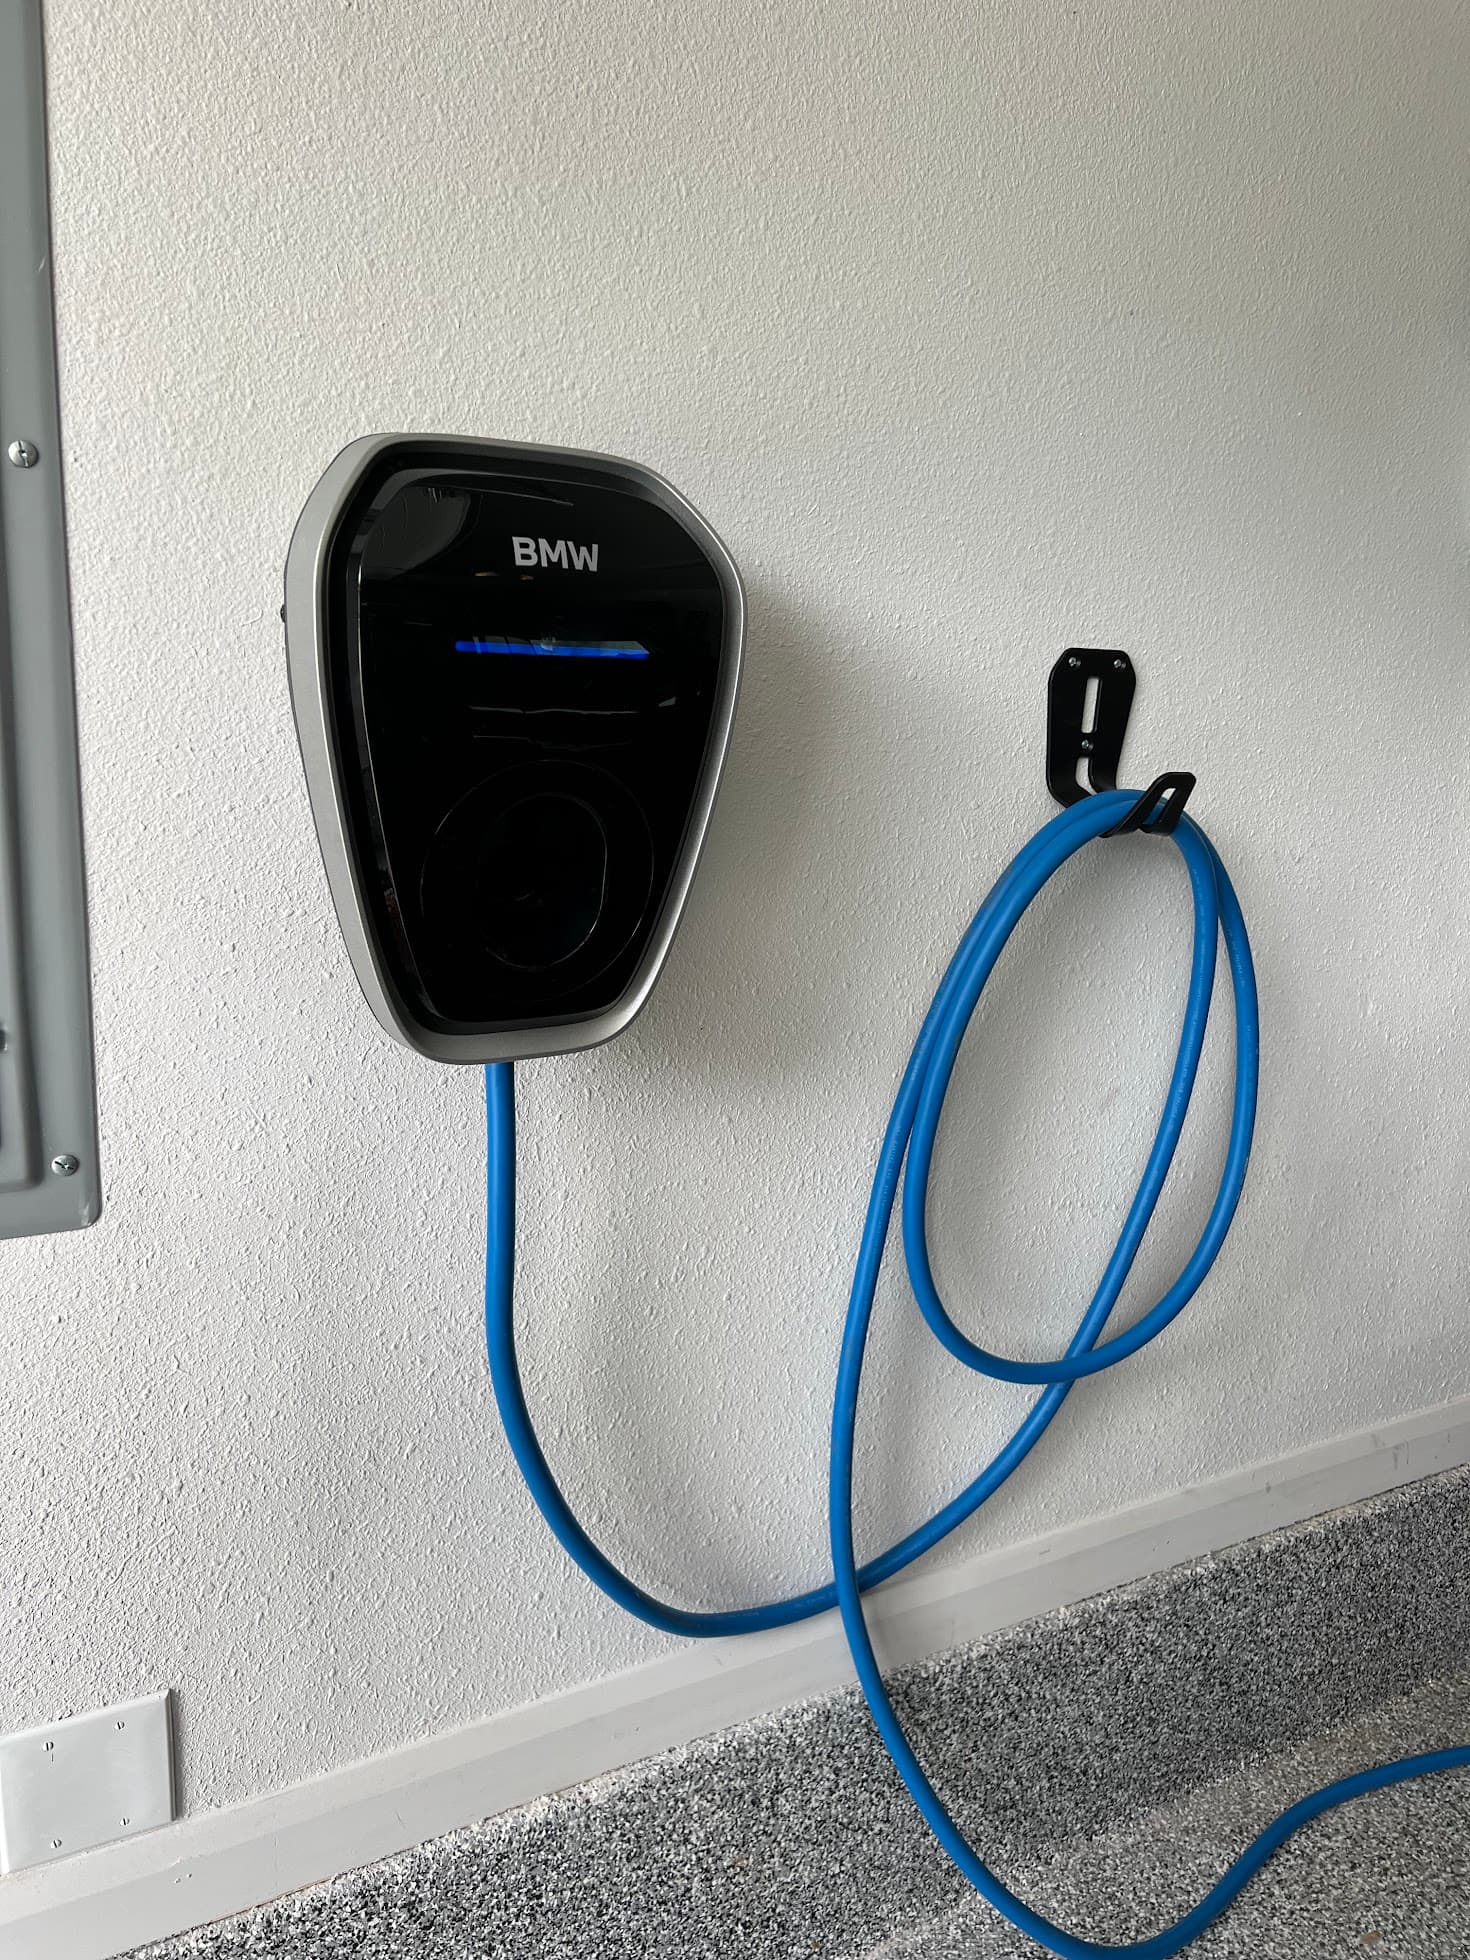
Step 3 — Choose the Best Charger Location
Garage Installation
The most common (and usually the easiest) home install. Pros:
- Protected from rain, sun, hail, and ice
- Easier cord management and storage
- Cleaner mounting options
- Often closer to the electrical panel
- Best fit for overnight charging
Plan around these questions:
- Which side of the vehicle is the charge port on?
- Do you back in or pull in?
- Is the charger cord long enough to reach without stretching across the bay?
- Is the panel already in the garage, or on the other side of the house?
- Is there wall space near the parking position?
Driveway Installation
Good fit if the vehicle lives outside, or if the garage is unfinished and used for storage. Plan around:
- Weather-rated equipment and exterior-rated cord
- Cord routing without trip hazards
- Mounting surface (pedestal, exterior wall, post)
- Distance from the panel (longer runs cost more)
- Protection from vehicle impact (bollards, mounting height)
- Whether trenching or exterior conduit is needed
Carport or Detached Garage Installation
Detached structures add complexity because the circuit may need to be run a significant distance — sometimes underground — and any existing subpanel needs to be checked for capacity. This is usually the most involved scenario, but very doable with the right plan. See home rewiring.
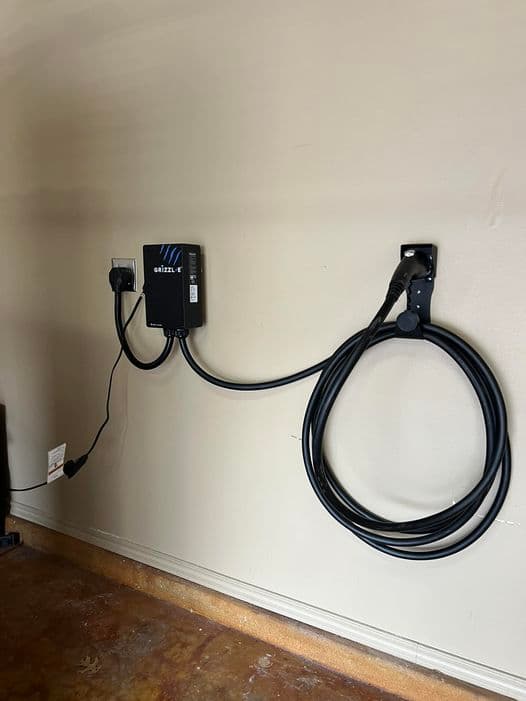
Step 4 — Decide Between Plug-In and Hardwired Installation
Plug-In Charger Installation
A plug-in Level 2 charger plugs into a 240V receptacle — typically NEMA 14-50 or NEMA 6-50, depending on the charger.
Pros
- Easier to remove or replace the charger
- Useful for some portable Level 2 units
- More flexible if you might move and take the charger with you
Cons
- The receptacle and plug must be properly rated for continuous EV charging duty (and not every "RV outlet" in the wall is)
- Outdoor receptacles need correct weather-rated enclosures
- Not always the best choice at the highest amperages
Hardwired Charger Installation
Hardwired chargers connect directly to the branch circuit — no plug, no receptacle.
Pros
- Cleaner, more permanent install
- Often the better choice for exterior locations
- Can support higher amperages (40A or 48A) more cleanly
- Fewer plug-wear failure points over years of use
Cons
- Less portable
- Charger replacement is electrician work, not a homeowner swap
The Right Answer Depends on Your Home and Charger
There's no single right answer here. The model of charger you choose, the location, the amperage, and your long-term plans all factor in. A licensed electrician should give you a clear recommendation after looking at the house.
Step 5 — Think About Charging Time and PSO's EV Rate
Overnight Charging Is Usually the Goal
For most Tulsa drivers, the goal is simple: plug in when you get home, drive away fully charged. DOE notes that Level 2 charging can typically refill a normal EV battery overnight, which is why most home installs end up Level 2.
PSO's EV Rate Rewards Late-Night Charging
PSO offers a residential EV rate designed specifically for households with plug-in vehicles. The headline points to know:
- Super off-peak hours: 11 p.m. to 6 a.m., all days of the week — this is the lowest-cost charging window all year
- Summer on-peak: 2 p.m. to 7 p.m., Monday through Friday, June through October — this is the priciest window
- Off-peak hours fill the rest of the day
For a daily-driver EV that parks overnight, the math is straightforward: schedule charging to start after 11 p.m. and most of your kilowatt-hours land in the cheapest window.
Smart Chargers Make Scheduling Effortless
Most modern Level 2 chargers have built-in scheduling, app control, and energy reporting, so you can set "charge from 11 p.m. to 6 a.m." once and forget about it. Some also support load-management features that throttle charging if the home is pulling near service capacity — useful in panels that are tight but not quite ready for an upgrade.
PSO has also offered a Level 2 ENERGY STAR EV charger rebate for residential customers (up to $250 at the time of publication) and runs a separate Charge Choice program. Check current eligibility on PSO's site before you buy.
M Electric can help install a charger setup that supports your daily routine and off-peak charging goals. → Contact M Electric.
Step 6 — Plan for Weather, Surge Protection, and Outdoor Safety
Tulsa Storms Make Outdoor Planning Important
Driveway and carport installs need weather-rated equipment, properly protected wiring, and impact-resistant mounting. Tulsa's spring storms — thunderstorms, hail, high winds, and occasional tornado activity tracked by the National Weather Service Tulsa office — are part of the design brief, not an edge case.
Whole-Home Surge Protection Is Worth Discussing
An EV charger is one of the most expensive single pieces of equipment connected to your home's electrical system. A panel-level surge protective device (SPD) is the cleanest way to reduce the risk of surge damage from nearby lightning, utility switching, and large-motor cycling. It also protects the rest of the home — HVAC, appliances, smart devices, the charger itself. See whole-home surge protection.
Avoid Temporary Charging Setups
EV charging is a continuous load — the circuit is at or near full draw for hours at a time. That makes it especially unforgiving of shortcuts. Don't use extension cords. Don't use a generic outdoor receptacle that wasn't installed specifically for EV charging duty. Don't tap an existing dryer circuit and assume it'll work. Daily EV charging deserves a dedicated, properly installed circuit. See electrical repair.
Step 7 — Understand Permits and Code Requirements
EV Charger Installation Is Electrical Work
The City of Tulsa lists an Electrical Permit Request Form under its Trade Permit Applications, and many EV charger installs involve permits and inspection depending on scope and location. A licensed electrician handles permit and inspection coordination as part of the job.
Licensed Installation Protects the Homeowner
Permitting and code compliance isn't bureaucracy for its own sake. It protects:
- Safety — installations get a second set of professional eyes
- Resale — buyers' inspectors and lenders ask about permitted work
- Insurance — claims involving unpermitted electrical work get complicated fast
- Warranty — many EV charger manufacturers require professional installation
Avoid Unpermitted Shortcut Installs
A cheaper install isn't a cheaper install if it triggers an inspection issue at resale, an insurance question after a storm, or a warranty denial when the charger fails. Use a licensed Tulsa electrician — see our Tulsa service area page for what we cover locally.
Common Mistakes to Avoid Before Installing an EV Charger
Buying the Charger Before Checking Panel Capacity
The charger that looked perfect online may want more amps than your panel can safely deliver. Order after the panel evaluation, not before.
Choosing a Location Based on the Closest Existing Outlet
An outlet in the wall doesn't mean a charger should plug into it. Existing receptacles are rarely sized or rated for continuous Level 2 charging duty.
Forgetting About Cord Reach and Parking Habits
Charger cords are typically 18–25 feet. Pick the mounting location around how you *actually* park — not around where it would be most convenient to run the wire.
Ignoring Future Vehicles
If you may add a second EV, switch to a larger-battery vehicle, or charge a friend's car occasionally, design once for both.
Assuming Every Level 2 Charger Installs the Same Way
Charger amperage, plug type, indoor vs. outdoor rating, smart features, and mounting options vary widely. The "best" charger for your neighbor's house may not be the best for yours.
Not Considering Tulsa Summer Peak Usage
PSO's summer on-peak window (2 p.m. – 7 p.m., June–October, Monday–Friday) is the most expensive time to pull power. Plan your charging schedule around it — your wallet will notice.
How Much Does EV Charger Installation Cost in Tulsa?
Cost Depends on the Home, Not Just the Charger
Per M Electric's own EV charger installation page, Level 2 EV charger installation in Tulsa typically ranges from about $500 to $2,500, depending on your existing electrical setup, the charger model, and installation complexity. A standalone 240V outlet installation for plug-in chargers typically runs $300 to $800, depending on panel capacity and location.
Cost factors that move the number:
- Distance from the panel to the charger
- Garage vs. driveway vs. detached structure
- Conduit routing difficulty (interior walls vs. exterior runs vs. trenching)
- Available panel capacity (and whether a panel upgrade is needed)
- Plug-in vs. hardwired install
- Charger amperage (32A vs. 40A vs. 48A all run different wire)
- Permitting and inspection
- Wall and mounting surface (drywall, masonry, exterior siding)
- Weatherproofing requirements
Why a Site Assessment Matters
A real number requires looking at your actual panel, the proposed charger location, the routing path, and the existing electrical setup. Generic online price ranges are a starting point — not a quote.
For a real number, schedule a site assessment with M Electric instead of relying on generic online price ranges.
Should You Upgrade Your Panel Before Installing an EV Charger?
Sometimes Yes, Sometimes No
Not every EV charger requires a panel upgrade. Some Tulsa homes already have plenty of capacity and need nothing more than a new circuit. Others need a smaller charger, a load-management device, new dedicated circuits, or a service upgrade.
Signs a panel upgrade may be needed:
- Older panel or fuse box
- 100-amp service
- Full breaker panel with no open slots
- Breakers that trip during normal summer use
- Lights that dim when major loads kick on
- Plans to add other significant loads (generator, hot tub, addition)
- A higher-amperage charger (40A or 48A) on a home that's already near capacity
See panel upgrades for what an upgrade actually involves.
Plan Once, Not Twice
If you're planning an EV charger plus a generator installation, a remodel, or other major upgrades over the next few years, evaluate the whole system together. Sequencing the work right (panel first, then surge protection, then EV charger, then generator) almost always costs less than doing each project as a one-off — and saves several "we'll have to come back" visits.
What to Expect During an EV Charger Installation
Step 1: Home and Panel Assessment
We start by looking at the panel, the service, the grounding system, the proposed charger location, and how you actually use the parking spot.
Step 2: Charger Recommendation
We recommend charger amperage, plug-in vs. hardwired, indoor vs. outdoor mounting, smart features, and placement. You'll get a clear written quote afterward.
Step 3: Circuit Installation
We install the correctly sized circuit — dedicated breaker, properly sized conductor, conduit where required, and an outdoor disconnect if code calls for one. M Electric's EV installations follow the National Electrical Code and local Tulsa requirements.
Step 4: Charger Mounting and Setup
Charger goes on the wall (or pedestal), positioned for the cord to reach the parking spot comfortably. Mounting is finished cleanly and securely.
Step 5: Testing and Homeowner Walkthrough
We verify the install, test the charger under load, walk you through the app and scheduling, explain what the indicator lights mean, and answer questions. If you have a smart charger and want it on the PSO EV rate schedule, we'll help set the scheduling up so charging starts after 11 p.m. by default.
Contact M Electric to schedule an EV charger site assessment.
Bottom Line: Plan the Electrical Setup Before You Buy the Charger
The best EV charger installs start before the charger ships. Tulsa homeowners who think through parking location, panel capacity, charging speed, PSO rate timing, weather exposure, future EV plans, and dedicated circuit requirements end up with a charger they're still happy with five years later. Homeowners who skip those questions usually end up paying twice — once for the rushed install, and again to fix it.
Ready to plan a home EV charger in Tulsa? M Electric can evaluate your panel, recommend the right charger setup, and install a safe, code-compliant charging solution. → Contact M Electric.
Frequently asked questions.
Do I need a Level 2 charger at home?
+
Not always, but most daily EV drivers prefer Level 2 because it's significantly faster than Level 1. The U.S. Department of Energy notes that Level 1 charging adds about 5 miles of range per hour, while Level 2 adds about 25 miles of range per hour — the difference between "ready by morning" and "still not full after two days." Plug-in hybrids and very low-mileage drivers may be fine with Level 1.
Can my current electrical panel handle an EV charger?
+
It depends on your panel capacity, existing loads, charger amperage, and future plans. A licensed electrician should evaluate the panel and run a load calculation before you buy or install a charger.
Is it better to install an EV charger in the garage or driveway?
+
Garage installation is usually cleaner, more protected from weather, and easier to manage day-to-day. Driveway installation is the right choice if that's where the vehicle actually lives. The best location depends on parking habits, cord reach, panel location, and weather exposure.
Should I get a plug-in or hardwired EV charger?
+
Plug-in chargers offer flexibility — they can be removed or swapped more easily. Hardwired chargers are typically cleaner, more permanent, and better-suited to outdoor installs and higher amperages. The right choice depends on your charger model, location, and long-term plans.
Does PSO have an EV charging rate?
+
Yes. PSO's residential EV rate gives super off-peak pricing from 11 p.m. to 6 a.m. all days of the week, with a summer on-peak window from 2 p.m. to 7 p.m., Monday through Friday, June through October. Most home EV owners save by scheduling charging to start after 11 p.m.
Does PSO offer EV charger rebates?
+
PSO has offered a rebate for ENERGY STAR-certified Level 2 EV charging stations (up to $250 at the time of publication), plus a Charge Choice rewards program for participating customers. Eligibility and rebate amounts can change, so confirm current details on PSO's site before you buy equipment.
How much does EV charger installation cost in Tulsa?
+
Per M Electric's EV charger service page, Level 2 installation in Tulsa typically ranges from about $500 to $2,500 depending on the existing electrical setup, charger model, and complexity. A standalone 240V outlet for a plug-in charger typically runs $300 to $800, depending on panel capacity and location. A site assessment gives you a real number.
Do I need a permit for EV charger installation in Tulsa?
+
EV charger installation is electrical work, and the City of Tulsa lists an Electrical Permit Request Form under its trade permit applications. A licensed electrician will determine what permits and inspections apply to your specific install and handle that coordination for you.
- U.S. Department of Energy — Alternative Fuels Data Center: EV Charging Stations
- U.S. EPA — Plug-In Electric Vehicle Charging Basics
- PSO — Residential EV Rate
- PSO — Time-of-Day Rate Program
- Alternative Fuels Data Center — PSO EV Charging Station Rebate
- National Weather Service — Tulsa Forecast Office
- City of Tulsa — Permits and Inspections